Sperry Vickers Hydraulic Vane Pump V100/200/300/400/500/V2P Series
Sperry Vickers Hydraulic Vane Pump V100/200/300/400/500/V2P Series
September 6, 2019 Comments Off on Sperry Vickers Hydraulic Vane Pump V100/200/300/400/500/V2P SeriesSperry Vickers Hydraulic Vane Pump V100/200/300/400/500/V2P Series
Seals and end covers
When you start to the part where the shaft seal needs to be installed, check where the right position for sealing lip. Double lip seals are put together with the spring toward the pumping cartridge. Single lip seals contain two pressure holes that are put in toward the shaft seal end of the pump. Then press the seal tightly into place and grease the lip with petroleum jelly or some type of grease that complies with the system fluid. Put the drive shaft into the body until you know the bearing is placed in correctly. Do this slowly tapping more and more til you know it is in there good. Next comes the snap ring.

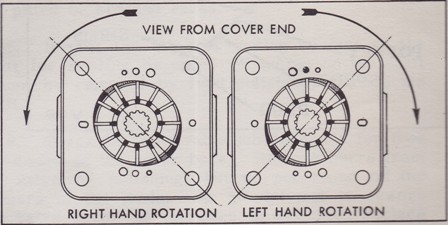
Always put in new orings in the body and cover. The ring locating pins go in the body and put in the ring that show the arrows on the perimeter points in the right direction of the rotation that is needed. Put the rotor on the shaft and put in the vanes in the rotor slots. Make sure the radius edges of the vanes are toward the cam ring. Put the pressure plate on the locating pins and seated on the ring. Use some grease, not to much to make sure the spring in the recess is in the pressure plate. Put in the cover with the outlet port in the right position. The screws need to be tightened to correct torque. Make sure you can turn the shaft by hand that there is no binding, then put in the shaft key. Assembly of the mounting flange or foot mounting to the pump is next. Lastly if a gasket is needed, make sure it is seated well to keep from misalignment of the shaft.
Call 800-361-0068
sales@hydrostatic-transmission.com
If you have further questions call or email us.